What you will need
K16 board with heatsink and fan
When you're reading this, you probably already have one.
USB Cable
USB type A male to USB type Mini B male for connecting your board with computer.
Power cable
For connecting power to your board. Klondike boards usually comes with Mini-PCIe female connector for power. In this case you need ???
Power supply
Good powersupply is a must, especially when running multiple boards. One board consumes up to 60W of power, so scale your PSU accordingly.
Computer
You will need a computer, any OS will do.
Computer software
CGMiner is the only one that supports K1 and K16 boards.
Running troubleshoot
No greed LED
Power to the board is missing. Check all the cables, check the PSU, if it is turned on. There is no on/off switch on the K16/K1, so as soon as power is applied, the green LED will light up.
Device not detected by CGM
Check all the cables, especially USB. They should be all connected and not faulty. Check if green LED is on.
CGMiner wasn't compiled with --enable-klondike option. Recompile with --enable-klondike.
Unit is faulty - if you're capable working with hotair and you have an oscilloscope, refer to Big troubleshoot section. In other case, return unit to the Manufacturer for RMA.
No nonces are found
Try to powercycle the unit. After programming, chips are usually stuck and powercycling restores normal state. Is this isn't helping, you can refer to Big troubleshoot section (again, you have to be capable of working with tools like hotair or oscilloscope) or you can return unit to manufacturer for RMA.
Device is constantly rebooting when fan is connected to onboard fan connector
Wrong type of fan used. Refer to How to build section for more information about type fans, or which components to change to be able to connect any type of fan.
How to run
This slightly differ between running K16 and K1. Running K1 is simpler, because you do not need any power supply or cables.
Running K16
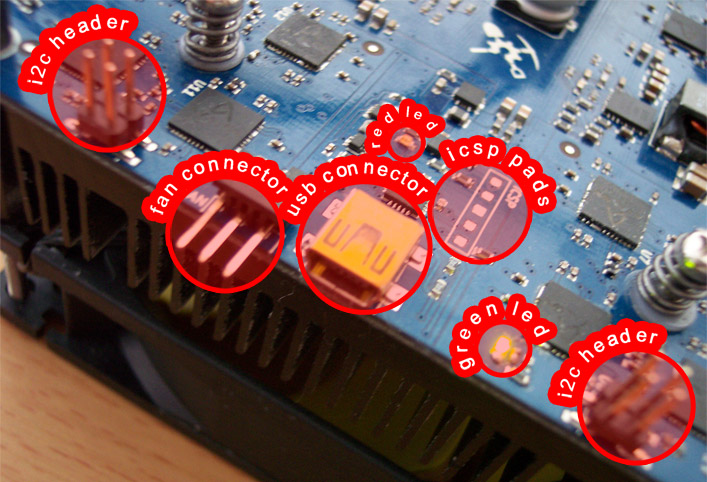
Your board has many different connectors, as you can see on the picture below. The two, we are going to use, are the USB Mini B connector and the PCIe power connector.
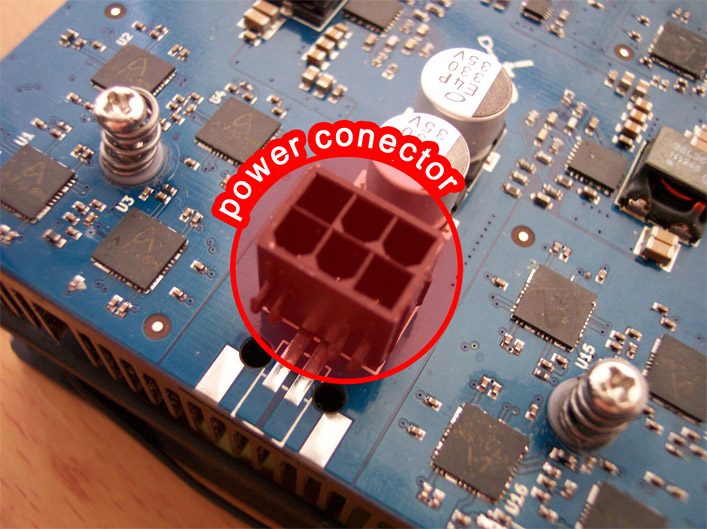
On image below you can see the power connector:
USB cable
Simply plug your USB Mini B cable to the K16 USB connector. It's located next to the 3 pin fan connector. Other end of this cable goes to the computer.
Fan
Be sure to connect the fan. You have couple of options to do this.
First one is to use on board fan connector. Using this connector brings one advantage - fan speed regulation. The board will regulate fan speed according to target temperature (can be configured in CGMiner) and measured board temperature, so you will do not wear the fan so quickly and K16 will be quieter.
Another option is to use a fan with Molex power connector and connect this fan directly to the PSU power outputs. No speed regulation in this case.
Connecting the fan is important. With latest CGMiner and firmware you can not destroy the board with disconnected fan, but work will be throttled when board reaches critical temperature, thus giving lower hashrates.
One note about the fans:
In original design (without changed components), the fan circuit was designed to accept only fans with open collector at a fan tachometer output. Most PC type fans do not have an open collector and connecting them is causing PIC to reboot constantly. If this is the case, refer to How to build section to determine correct fan type, or which components to change to be able to connect PC type fans.
With devices from Liquid Synergy Designs, components were changed and any fan type can be used. With PC fan however, you have to connect the fan after the board is powered up, otherwise PIC may fail to initialize.
Power supplies
Next connect the power connector from your power supply to the K16 power connector. Any computer ATX power supply will do, there are just two conditions:
- Be sure to check that 12V rail is capable of delivering sufficient current (you can read about this lower in this document)
- PSU has to have a PCIe connector (this is usually used to power GPU's)
or you can use an industrial power supply (more about this lower in this document).
One note: the capacitor nearest the 6 pin Molex connection (PCIe connector) is too close, and will result in a tricky situation trying to remove the PCIe cable if you leave the latch on. You can resolve this by clipping the clip on the end of the cable that connects to the board.
When you connect the power supply and you turn it on, the green LED next to the USB connector should come on. If thats not the case, something is wrong - PSU is not on, cable from wall to the PSU or from the PSU to the board is loose, or unit is faulty.
Determining correct power supply
This is really an important step. Using power supply incapable of delivering sufficient power can cause multiple problems - from lowering performance of the board to burning all the stuff in the flames. The board consumes up to 60W of power when overclocked to 350MHz. It's even more when overclocked more, so the power supply have to be able to deliver this sorts of power.
Computer power supplies
All computer power supplies have sticker on them. On this sticker, there are all the power rails of the power supply and their corresponding power outputs. Basically you're looking for 12V rails. Some power supplies have more than one, other have only one. And be aware, that the power, that PSU is capable delivering at 12V rails is not the same power, that is written at the PSU itself (like Corsair 550W - it wont be able to deliver 550W from the 12V rails. It will be like 350W). So be sure to check the sticker with all the voltages and their power outputs.
Since one board consumes up to 60W, youre looking at the power output figure at the PSU. If you want to run just one board, PSU has to be able to deliver at least 60W of power from its 12V power rail. On cheap ATX PSU's, this value is often the peak power, not the power that PSU is capable of delivering during long periods of time. So to be safe, you're looking for a figure that's more than 60W (80 for example).
If you're going to run for example 3 boards, the power you need is 3x60W = 180W of power from 12V power rail(s). If you have a PSU, that has multiple rails (for example 150W each), you will connect 2 K16 to one rail, and the other one to the other rail. Determining which rail is which is sometimes not easy, but manual that comes with the PSU should explain this. If not, try to connect each K16 to different connector that comes from the PSU. By connecting boards like this, you will be using 120W of 150W from the first rail, and 60W of 150W from the second one.
One warning though. If you have PSU that is capable of, for example, 300W at 12V rails, do not connect 5 K16 to this PSU. Connect only 4. With 5 K16, you will be using exactly 300W of power (when overclocked to 350MHz), but the PSU wont be able to keep up with this. It can run fine for a while, but will probably burn-out. I've destroyed two PSU's like this. One literally exploded, other one just stopped working. If you're expecting some sorts of protections from cheap computer PSUs, you're wrong. No OCP, no overheat protection there.
Industrial power supplies
Industrial power supplies usually have only one output voltage. They are cheaper than computer ATX power supplies, but by default do not came with PCIe connectrors. They comes with screw terminals to connect the leads to them. This types of PSUs are usually capable of delivering power thats written on them for a long periods of time (so no peak power figure there like on most of the computer ATX PSUs).
You can buy those for example on e-bay. The one quite good manufacturer of industrial PSUs is company Meanwell. But on e-bay, there are lots of clones, starting at 30USD delivered for 350W of power at 12V. If you can modify the wiring, I would suggest you to go with this type of PSUs.
Power consumption
K16 power consumption varies based on clock speed, connected fan etc. You can look up rough figures in a table below (measurements done with fan connected).
| Speed [MHz] | Voltage [V] | Current [A] | Power consumption [W] |
| 282 | ? | ? | ? |
| 300 | ? | ? | ? |
| 325 | ? | ? | ? |
| 350 | 12.5 | 4.85 | 60 |
Computer software
Only software that currently supports K16 or K1 boards is CGMiner. You can download it compiled, or you can compile it yourself.
Running on Windows
Thanks to Unacceptable for Windows howto.
We wont be covering compiling CGMiner on Windows here, since it's more complicated than on Linux, plus you would have to download some aditional software to compile.
If you want to run CGMiner with Klondike support on WIndows, you have to download compiled CGMiner from http://ck.kolivas.org/apps/cgminer/3.8/ (you want to download file with -windows name in it). Always try to download the latest version of CGMiner. When this was written, latest CGM version was 3.8.3.
Next download libwdi from http://sourceforge.net/projects/libwdi/files/zadig/. It is a library, that automatically installs USB drivers for CGMiner (WinUSB).
While downloading, you can hook-up K16 to your computer. After that is done, power K16 up. Extract Zadig, and install it. After installation, the K16 should be ready to use. Extract CGMiner to some folder, create config file as descriebed below (config for CGMiner is same for Windows and Linux) and then simply open cgminer.exe. All Klondikes should be detected.
Also, do not forget to look at Typical running conditions for some common issues.
Compiling and running on Linux
Compiling on linux is quite straightforward process. You will simply download the cgminer sources from it's Github repository https://github.com/ckolivas/cgminer. You can go to the Github with your browser, and click "Download ZIP" at the right side of the page, or you can clone it with GIT.
Downloading ZIP
You can download the source files compressed in one ZIP file. After you've downloaded ZIP archive from Github, you have to unzip it. After you're done with it, there should be a directory called cgminer-master. Rename it to cgminer (so you will be able to just copy-paste commands later).
Cloning with GIT
To clone it with GIT you will simply write this to your OS console:git clone https://github.com/ckolivas/cgminer cgminerThis clones the whole repository to your computer into the folder named cgminer in the current location. To be able to issue this command, you have to install git software. The best way to do this, is to use packaging system that comes with your distribution. For gentoo, the command for this is "emerge git". Ubuntu uses "sudo apt-get install git-core". For specific distribution, try google with "howto install git in <yours distro name>" query.
After you've downloaded cgminer sources, you will simply issue this commands:cd cgminer
chmod +x ./autogen.sh
./autogen.sh
./configure --enable-klondike
make
When this finishes, compiled binary called cgminer will be created in the same folder ready to be used. Next you need to create a configuration file. This can be done for example with nano. Simply write:nano -w cgminer.conf
Nano editor will show up. Copy and paste this text into it:{
"pools" : [
{
"url" : "firstpooladdress:port",
"user" : "your_username",
"pass" : "your_password"
},
{
"url" : "secondpooladdress:port",
"user" : "your_username",
"pass" : "your_password"
},
{
"url" : "thirdpooladdress:port",
"user" : "your_username",
"pass" : "your_password"
}
],
"failover-only" : true,
"klondike-options" : "300,50"
}
When you're done with it, save it by pressing CTRL+X and confirming with Y and Enter.
You will have to change couple of values there. First one is Pool url - "url" in configuration file. You can determine this on your pool of choice homepage, or from a table below. This tells the cgminer where to ask work from, and where to send the results.
| BTCGuild | Eligius | Slush | Bitminter |
| stratum.btcguild.com:3333 eu-stratum.btcguild.com:3333 |
stratum.mining.eligius.st:3334 | stratum.bitcoin.cz:3333 | mint.bitminter.com:3333 |
Another one is "user". This is your username, which you can get from a pool. Password ("pass") can be nowadays usually left empty, but if this is not the case, you can determine this at the pool.
You can add as many pools as you wish, this configuration uses three, with failover strategy. That means, that you will be, by default, using first pool and when that one fails, you will jump to the second one in the config file. If that fails, you will jump to the last one.
If you want to use only one pool, config file will looks like this:{
"pools" : [
{
"url" : "firstpooladdress:port",
"user" : "your_username",
"pass" : "your_password"
}
],
"failover-only" : true,
"klondike-options" : "300,50"
}
Best practice, however, is to use more than one pool, because in a case of an DDoS attack or pool failure, you wont support network anymore.
Via option "klondike-options" you can tell the board the clock to run chips at and the target temperature ("clock,targettemp"), that the board will try to hold by adjusting fan speed (this only works with the latest firmware).
When you're done with compiling and configuration, you will simply issue this command:./cgminer --config cgminer.conf
CGMiner should start up with all connected Klondikes listed in the devices section:KLN 0: 350MHz 0% 56C | 3.591G/5.463Gh/s | A:8768 R:114 HW:0 WU: 76.3/m
KLN 1: 350MHz 0% 56C | 5.452G/5.513Gh/s | A:9086 R:130 HW:1 WU: 77.0/m
KLN 2: 350MHz 0% 55C | 7.045G/5.475Gh/s | A:9396 R:100 HW:0 WU: 76.5/m
When K16 is communicating with computer over the USB, red LED is flashing.
Typical running conditions
K16 is usually running under 50°C (120°F) with ambient temperature around 26°C (80°F). Firmware will, by default, try to keep 50°C by adjusting fan speed, but this can be changed in CGminer config file.
Firmware will be running at 350MHz (333 in the latest one) by default, which is quite stable clock setting when ambient temperature isn't higher than 28°C. There is also a window for another overclocking. Firmware accepts values up to 450MHz in steps of 1MHz (so you can set frequency like 321 or 353 MHz).
The board with the CGMiner 3.7.2 with "Slub debug" (if using RPi) and "went idle" (on any platform) mod below is rock stable. I've been running it 5 days in a row without any problems or freezes on RPi.
CGMiner says Overheat and disables the board
If your board is running at a temperatures above 53°C, you probably want to know, that there is a safety in CGMiner, which disables the board that reaches 53.5°C. It will enable it again when it cools down to about 45°C. So if you're getting messages like "Overheat, disabling", you have a couple of options:
- Move the board to a colder place, so it wont reach cutoff temperature
- Edit the CGMiner driver and change cutoff temperature
If you can move your boards to a colder place, please do. If it wont help, continue with editing the CGMiner driver.
If you want to change CGMiner cutoff temperature, you have to edit driver-klondike.c file. At around line 63 there is a define, which defines cutoff temperature in degrees celsius:#define KLN_KILLWORK_TEMP 53.5
Change it to some other value, for example to 63.5. When changing this value, have on mind, that this is a safety. So do not enter some crazy values there (like 70 or so):#define KLN_KILLWORK_TEMP 63.5 and then recompile CGMiner.
Raspberry Pi is locking up when running CGMiner
If your RPi is freezing randomly after some time (could be minutes, could be hours or days) with error like Oops: PREEMPT ARM, CPU0 Not tainted printed out over HDMI, and with locked up ethernet and USB interfaces, you have to add following option to the /boot/cmdline.txt file on SD card:
Make sure you do not add that option to the new line if some other options are already present in that file. Always paste it behind all other options delimited with space. Also, before editing, make sure your /boot partition is mounted by issuing this command:
It should print out something like this when it is mounted:
If it is not mounted, that command returns nothing. To mount /boot partition, just do:
Freezing is caused by some bug probably in Kernel itself, as you can read on http://www.raspberrypi.org/phpBB3/viewtopic.php?t=55370&p=421883:
"We recently changed the kernel memory allocator to SLUB for increased performance (incidentally also allowing this sort of debugging) which meant that this bug, which has probably always been there, has crawled into the open." by jdb.
To this date, this bug is still present in Master and Next branches of RPi firmware/kernel (https://github.com/raspberrypi/firmware) - up to a Kernel version 3.10.15 and maybe even latter.
As of november 25th 2013, this bug is still present in official RPi firmware with Kernel 3.10.19.
I'm getting lots of "KLNn: Went idle before work was sent" messages
This messages simply means, that the work buffer in Klondike was empty when new work have been pushed in by the CGMiner. This could mean, that the board was actually working on the very last work item in the buffer, or that the board was idle for a split second before communicating with CGMiner. You can greatly reduce those errors by changing two defines in driver-klondike.c file around like 58 like this:
#define CMD_REPLY_RETRIES 4
Dont forget to recompile after this change by simply issuing command "make" in CGMiner directory.
Are you on BTCGuild and running Klondike? Join the Klondike team!
Issues with running devices? Look at the troubleshoot at the right.